


Our First Blog Post
Posted by Heather Benamy on 14th Nov 2016
Welcome to our new blog Small Talk! We’ve wanted a blog for quite some time now, and with the recent upgrades to our new website our wish finally came true. We may be small but we have big things to talk about here at miniatures.com! Here we’ll share new and exciting happenings going on at miniatures.com as well as tips and tricks and how-to projects for your mini pleasure.
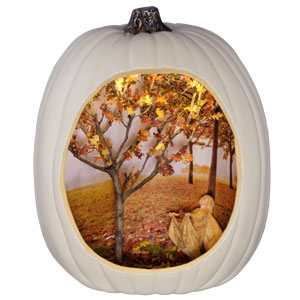 To kick off our first blog post, we’re sharing this pumpkin spice and everything nice fall fairy garden project. If you have a “mini” obsession like us, then you probably try to incorporate miniatures into all of your seasonal décor. This fairy garden project is a great way to add warmth to your home by bringing the outdoors inside, not to mention it will be sure to delight guests young and old alike during the holiday time. You can buy a craft pumpkin at almost any available craft store. The best thing is that they are incredibly lightweight and no scooping out the inside is required. That’s a major time saver, and not to mention your project can last forever! First, we searched the Internet for an autumn landscape image to serve as the background for our fall fairy scene. If necessary, you can print the image into sections to make sure it covers entire background inside the pumpkin.
Next, we looked outside for a “branchy” twig to be our tree. Once we found the perfect mini “tree”, we were ready to add leaves. We used our Orange and Rust Roping and applied a small amount of Brown Mini-Bond with a toothpick where we wanted the leaves to go on the twig. While we let our tree dry for a couple of hours, we cut a sheet of Noch Grass to fit the ground area, and cut a small hole for where we wanted our Crabapple Flower Fairy to go. We then glued the grass to the ground area and inserted a pushpin from the bottom of the pumpkin to secure the fairy.
Once we had the ground area how we liked it, we nailed our tree into place. If you have a hot glue gun, that will also work perfectly. We added Battery Operated String Lights to our pumpkin to give it an enchanting glow - after all, it’s dark inside of a pumpkin! You can easily accomplish this by drilling a small hole in a hidden spot and feeding the lights through. Secure the battery case with masking tape on the outside of the pumpkin. We sprinkle extra leaves on the ground beneath the tree and the fairy’s skirts. Just like that, we have the cutest pumpkin in the patch! For step-by-step project instructions on our Fall Fairy Pumpkin, visit our Mini Projects page in the Creative Corner. Thanks for checking out our first blog post! Check back with us as we share with you what’s brewing for Halloween here at miniatures.com.
Happy Fall Y’all!