by Fran Casselman

Materials & Tools:
#1073 Fred's Wood Weathering Stuff
#2130 Noch Grass
#75073 White Porch Swing
#60063 Leafy Vine
#24483 Purple Million Stars Flowers
#9729 5-Pc. 3/4"H Tree Set
#36171 Reindeer Moss
Container is a small crate available at Home Depot
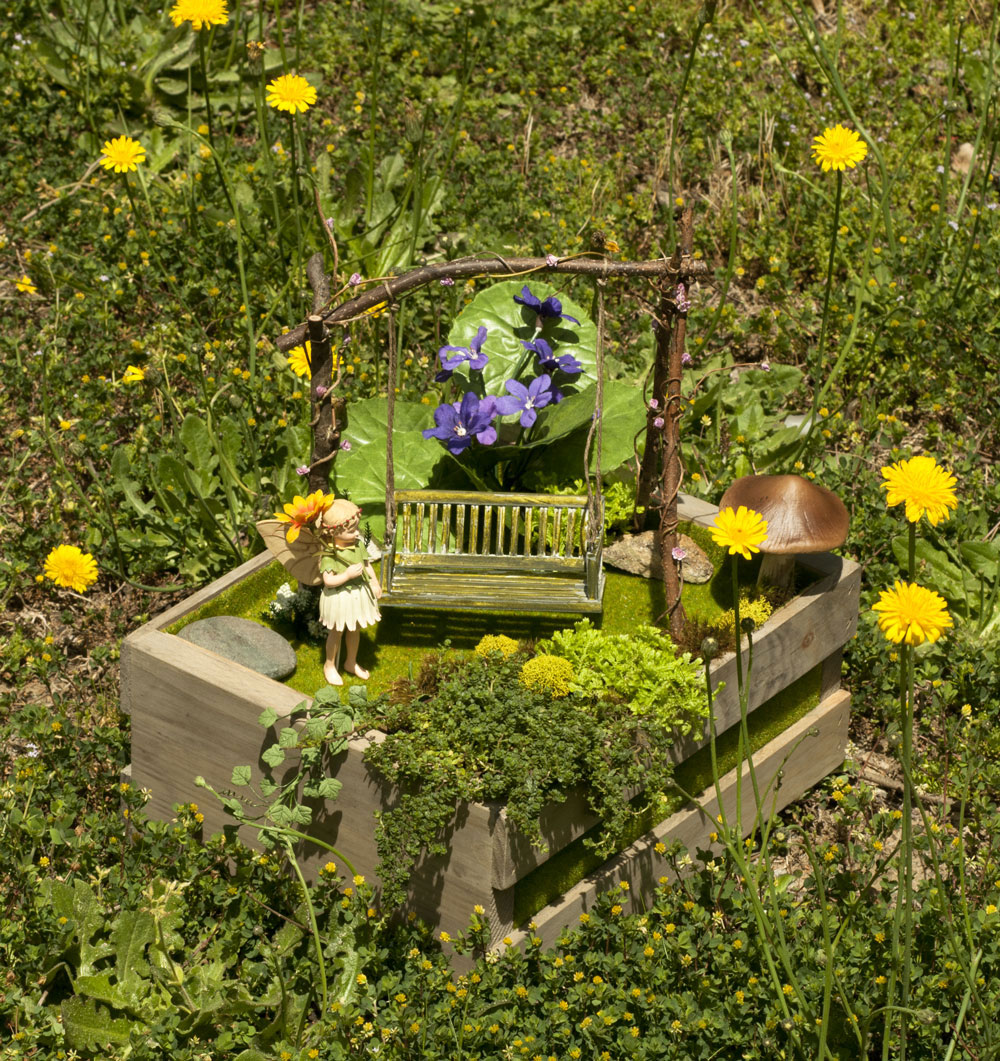
Other items in the scene are live plants (trailing over front and side of crate), artificial plants (violet in background), natural twigs and vines (swing frame), rocks, and purchased accessories (fairy, mushroom).
You will also need basic craft supplies and rigid foam packaging material (Styrofoam).
Prepare the container; this crate needed approx. 1/3 of the bottle of Fred’s Wood Weathering Stuff to color all surfaces. Additional applications should result in darker color, if desired. (Do not apply directly from the bottle. Shake, pour into a small bowl, brush on and repeat as necessary. Do not return unused solution to the bottle.)
Glue or staple pieces of Noch Grass to cover openings between crate slats. Reuse rigid packaging foam material to fill the crate, cutting layers to fit and create a level surface lower than the top edge of the crate. (Cutting foam is messy. Always use a serrated knife or small hand saw and cut outdoors or inside a paper bag if possible to help control the mess.) Cover the top surface with Noch grass, running it up the inside of the crate to the top edge. Use glue or double-stick tape to adhere the grass to the inside crate edges, but do not glue the grass to the foam surface.
Gather the other elements of the miniature fairy garden and plan placement. The live plants, in this case Creeping Thyme (thymus serpyllum, at the front corner) and Selaginella Fern (selaginella, next to the creeping thyme) are still in their nursery pots (4” square and 2” round, respectively). Once placement was determined, an opening was cut in the grass sheet and the foam was cut away to allow room for the pot(s). The grass sheet was trimmed away where necessary but can still cover the edges of the pots. The pots can be removed for watering and returned.
To craft the swing frame, search for suitable twigs, branches and vines. Select the main support pieces and cut to approximate size, leaving extra length that will be set into the foam base. Use fine wire to join the frame pieces; drill and glue as necessary. Make each support separately; cut and attach the crossbar only after the supports are secure. Glue on fine hemp twine (from the jewelry area of a craft store) or collected vines to cover the wire. As you work, check that the finished unit will fit where you want it to go and adjust as needed.
Prepare the swing. Remove the hanging chains but keep the screw eyes and jump rings in place. Change the appearance of the swing as you desire; the look in the example was achieved with a combination of sanding, paint and markers. For this woodsy look, paint the shiny metal parts black or dark green.
Put the swing frame in place; cut sharp angles as you trim the extra length to suit the final placement. Cut through the grass paper and push the frame legs into the foam base. Keep it high to start, and lower it as needed once the swing is installed.
To install the swing, cut two lengths of the twine. Fold each in half to find the center and put over the crossbar at each side. Keeping the tails together, make a knot close to the bar. Put an end through the jump ring on the swing and fold the twine up against itself to the approximate height you want. Hold temporarily with tape or clips; do the same for the remaining ends. When you have the right height, trim an end to about 1” and glue the twine to itself, rolling between your fingers to compress the fibers together. Check the height and level, adjusting if needed as you finish the other ends. Settle the frame into place.
Add natural vines or more twine to decorate the swing frame. To add the Million Stars Flowers, trim the stems short and glue in place. Add touches of green paint to suggest emerging leaves, if desired.
Complete the scene with other natural or artificial floral elements and purchased or crafted accessories.
The fairy in this scene is the Daisy Fairy, a figurine based on the Flower Fairies paintings by Cicely Mary Barker from her books first published in 1923. The figurines were newly available about 20 years ago, but have been reissued and can now be found online as well as through eBay or Etsy and elsewhere.
