
by Fran Casselman
Materials & Tools:
Printer paper
1/2" square dowel
#1249 Weldbond® Glue
1/8"Dia x 4"L lollipop sticks
#16073 Retractable Snap Knife
#600021 Self-Healing Cutting Mat
Paint or markers
"Extra-thin" Toothpicks
Small pliers
Foil (candy wrappers)
#11872 T-tip
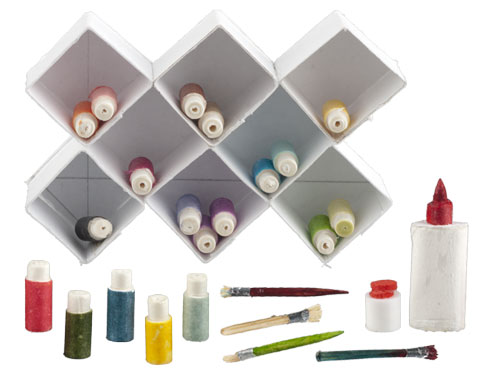
The wall cubbies are made of ordinary printer paper, using a short length of 1/2" square dowel as a forming tool. Wrap shiny tape around one end of the dowel, so the glue will not stick to it. Cut at least six strips of paper 1/2"wide x 2 1/4" long. Wrap a strip tightly around the forming tool, square at the end, and glue the overlap securely. Slide the paper off of the tool and let the glue set while you make more. Then, crease the folds tightly to make sharp corners. On another small piece of paper (or graph paper), mark an intersecting vertical and horizontal line. Apply glue to the edges of one of the boxes you made and center it on the drawn lines, so that the corners all touch a line. Let it set a bit, then add others along the lines, gluing where they touch and keeping everything square. When you have as many as you like (six shown here), let it dry thoroughly. Cutaway the excess paper and fill your cubbies!
To make the paint bottles, you need lollipop sticks, about 1/8" diameter by 4" long, from the cake decorating section at a crafts store. (Do not substitute wood dowels.) Lollipop sticks are made of tightly rolled paper, which can be unrolled to create bottle caps. Mark a series of 3/8" lengths on one of the sticks. On a cutting mat, roll the stick under a sharp craft knife to cut the length. Try to keep the cut as straight as possible; it must stand up on one end so sand if necessary. Using paint or markers, color the bottles as desired. Then start another cut in the same way as the first, about a quarter of the way down from the top, but do not cut all the way through. Make a vertical slit in this short section, and begin to unwind the paper to reveal the white core. When it looks about right for a paint cap, secure it with a tiny amount of glue and cut off the unwrapped strip. Add labels if desired.
There are a number of online tutorials for making mini paintbrushes. I was not pleased with my results for a “real-bristle” mini brush, so I have an alternate method that works very well. You need “Extra-thin Toothpicks” from Amazon (use that exact search term); useful for so many projects. You can also use conventional toothpicks, which need to be shaved and/or sanded to a smaller diameter. Cut the thin toothpick into lengths of 3/4" or so, and use small pliers to crush one end, causing the wood fibers to separate. If your toothpick has a square end and you leave the end flattened, you get a square-ended brush. When you sand the end into a rounded shape first, and reshape the flattened tip, you get a rounded brush. Color the bristles with a marker or leave them natural; color the handle with markers, paint or nail polish, for shine. Cut a tiny snip of foil (candy wrappers work) and glue around the handle just below the bristles.
The glue bottle is a 3/4" length of white paper straw, slightly flattened. Glue the open ends to scraps of paper and let dry. Trim the excess paper away and add a cap made from a slice of a lollipop stick with the small end of a T-tip (#11872) glued on and painted. The short pot is another slice of a lollipop stick with punched fun foam for the cap.