by Fran Casselman

Materials:
#75253 Large White Open-Back Shelving Unit
#9667 Beadboard Wall Sheet 7" x 24"
#9110 Strip Wood 3/8"W x 1/32"
#17516 Strip Wood 3/16" x 3/16"
#65549 Gunmetal Drawer Pulls
#10970 Four Gunmetal Door Knobs with Escutcheons
#65555 Four Gunmetal Butt Hinges with Nails
Double-layer chipboard
Thin chipboard or heavy cardstock
Coffee stirrer or similar
Thin, clear, packaging plastic (such as from a Houseworks door or
window, or similar)
Tools:
#1249 Weldbond (White glue)
#67196 Handy Stick
#16073 Retractable Snap Knife
#600021 Self-Healing Cutting Mat
#10115 12" Stainless Steel Ruler
#55538 Straight Snub-Nosed Scissors
fine-to-medium sandpaper
masking tape, glue stick, pencil
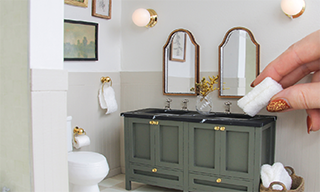
This dramatic transformation is actually pretty easy and does not require a lot of special skills or tools. It is designed for a paint finish and would not be suitable for staining. Although the doors in this example are hinged and working, they do not have to be. The drawers are simply faux fronts; they do not work, but could be made functional with a few extra steps.
Instructions:
Use the glue stick to securely paste the paper templates onto lightweight chipboard or heavy cardstock. When the glue has set, use the knife, mat, and ruler to cut out the template pieces. Discard the marked portions. Check that the pieces will fit your shelf unit; adjust if necessary.
Glue the #9110 strip wood to one pair of the door frame panels and all four of the drawer-front frames. The corners are not mitered; the long sides are put on first and the short sides filled in. This thin strip wood is easy to cut with utility scissors, and you do not need to measure and cut in advance. Apply glue to a long side and spread to a thin layer, all the way to all edges. The Handy Stick is very helpful for spreading the glue. Lay the strip wood in place and trim to the edge of the cardstock (or chipboard). Work on another door or drawer-front next, to give the glue time to set. After all the long pieces are glued and cut, move on to the short pieces. This is a little trickier, but not difficult. When all are done, weight them with a heavy book or similar and allow to dry thoroughly.
Sand all surfaces of the shelf unit to provide a good surface for paint. Thoroughly wipe it down to remove all sanding dust.
Place the shelf on the beadboard sheet and use a pencil to draw the size for the back panel. Cut it out with the knife and ruler. Glue the beadboard to the back of the shelf with a thin line of white glue at all the contact points. Use masking tape to secure the panel in place, if needed. Place flat on the work surface and weight (with food cans or similar) while the glue dries.
With the remaining door frames as a guide, cut the thin packaging plastic to size; smaller than the outside dimension but larger than the opening. Set the pieces aside.
When the door/drawer frames are dry and flat, trim or sand any edges that may not be quite flush. Glue the drawer fronts onto the drawer base panels. Before the glue sets completely, check that there is a very thin line between the top and bottom drawers and that the panels still fit your shelf.
Paint all parts, including the coffee stirrer or similar for the astragal, a strip covering the gap between the doors (interior door frames do not have to be painted but it is okay to do so). Paint at least one coat on both sides of the cardstock/chipboard pieces even if they will not show (this prevents warping). More than one coat may be needed, but check that the paint layers do not affect the fit of the panels. When completely dry, sand where needed.
Assemble the doors; glue the thin plastic panes to one side of the frames and the second side on top. Make sure the edges are flush, weight, and allow to dry.
The completed door and drawer panels may be glued in place permanently with white glue; a more temporary glue, such as rubber cement, may be used if you will want to try another look in the future.
Glue on the drawer pulls. Glue the astragal piece to the edge of the right-hand door so that it covers the gap between the doors. (The escutcheon [keyhole plate] is from #10970 set of doorknobs/escutcheons.)
The doors may be hinged (use #65555 hinges to match the drawer pulls).


